For most websites, images make up more than half of your pages’ weight, according to httparchive’s State of the Web report. Half of your pages’ weight.
That’s probably why when you run a page speed test you’re told to reduce or compress your images to improve your load time. You’re not alone.
 Many of us want to shrink images (and perform some true SEO wizardry) to improve our page speed metrics. Not only could optimizing your images for web mean faster load time and less storage on your server, but it could help to improve your rankings and traffic flow. Talk about magic!
The key is, finding the balance between the lowest file size and acceptable image quality. We’re here to help you find that optimization sweet spot. (Though you might not look as cool as this magical giraffe riding a bike while doing it, sorry).

Choosing your Image File Type
Let’s keep this as simple as possible. There’s three basic image types for web, each with their own set of magical advantages:
-
JPEG/JPG. // This popular file type can be saved in a wide range of qualities between low and high. It’s a great format choice for vibrant hero images, products and photos. The JPEG extension also works great for large-scale pictures or background images.
-
PNG. // This is the go-to format for graphics with heavy textual elements or for logos, as it preserves the original image’s quality without causing pixelation when enlarged. Also, this is the only format for images with a transparent background. PNGs are crisp and clean, but at the cost of a larger file size than most JPEGs.
-
GIF. // For a brief visual animation, these mini video clips are the way to go. Our "Yer a Wizard, Harry" clip seen in the intro of this article was a GIF file format, and because these clips are usually only a few seconds long, involving limited frames, they can be quite small if compressed correctly.
YOUR MAGICAL OPTIMIZATION SPELL: If you are uploading an everyday picture, use JPEG. If it’s an infographic, logo or an image where you need a transparent background or have textual elements people need to read, use PNG. If you need motion, choose the GIF extension.
Choosing your Image Editor
Many marketing professionals trust Adobe Photoshop for image optimization, but since it’s a subscription-based software, some choose Gimp and Affinity Photo. Don’t overcomplicate it. Really any well-known image editor will do!
For the compression and save settings used as examples in this article, we used Photoshop. It's a safe industry standard— and for many, this handy image editor is totally worth the monthly subscription.
Trudging through the Lingo Jungle
When it comes to image quality, there’s a lot of acronyms and confusing technical terminology. Don’t get lost in the blur of letters; we’re here to explain how to best optimize your images for web.
CHOOSING YOUR COLOR MODE:
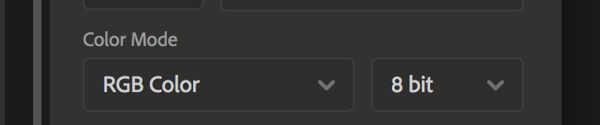
CMYK Versus RGB
CMYK stands for cyan, magenta, yellow and key, the pigments used in ink cartridges to form a full spectrum of colors. In printed materials, this wide range of blending helps to form a quality image containing complex hues.
Computers, however, operate a little differently than print. RGB stands for red, green and blue, and is the ideal color model for viewing on screens. Each image pixel on your computer or phone screen is a light source, and projects a combination of the primary colors to form a final beam of light. Long story short, RGB should always be your color mode choice for online image optimization.
8-Bit Versus 16-Bit
Once you pick the RGB color mode, it’s going to ask you what “bit” you want, which might tick you off— just a bit (so punny).
Simply put, 8-bit is your standard, containing 16.8 million combinations of colors. That’s a crazy amount of color data, and you don’t even need that much. As the bits increase from 16 to 32, you start getting trillions of color choices, and your file size increases too. Think larger the bit = larger the file size = slower the image loads.
Sixteen-bit is used often for complex editing, where you need access to a wide gradient of colors for refined details. For standard web display, choose 8-bit all the way.
CHOOSING YOUR RESOLUTION:

PPI Versus DPI
DPI stands for dots per inch— another printer term. Your printer forms an image on a page by stamping a bunch of little dots into a pixel space. The more color in one pixel space, the more detail. Simply put, the higher the DPI, the better tonality and the smoother the color blending in the print world.
PPI, or pixels per inch, is the number of pixels per inch on your screen. Spoiler alert: these pixels are fixed in size, depending on your device. Therefore, it’s not something you can change on your end while editing an image. A 72 PPI image on your computer will look the exact same as one with 2000 PPI, because your device has a set PPI within the screen.
If your image will be strictly viewed digitally, PPI doesn’t really matter— and neither does DPI. Your image file dimensions in pixels will determine your file size and quality, not your PPI (yeah, confusing). Luckily, you don’t need to get into the weeds. Given the option, stick to 72 PPI for web-displayed imagery. The more pixels you jam in per inch to an image, the larger its file size and the slower it'll take the load— reducing your page speed.
There is an exception to this rule... Will be attaching a fancy coupon or offer to your online page, which you are specifically asking your viewers to print? This is a completely different conversation, where you should care about DPI and PPI. Check out 99designs article for more details.
YOUR MAGICAL OPTIMIZATION SPELL: When it comes to optimizing images for web, choose RGB color mode, 8-bit and 72 PPI.
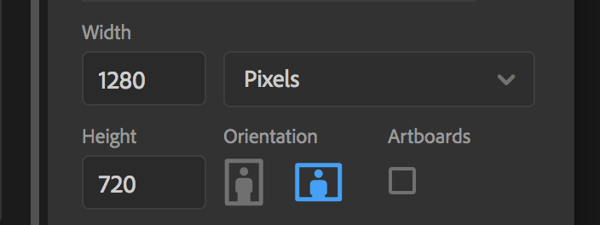
Selecting the Right Image Dimensions
The short answer is, there’s no “correct” image size. We’re not going to offer some magic dimension because every webpage and use case for the visual will be different.
Review these image dimension best practices to optimize your images for web:
-
Look at your web platform’s image optimization recommendations and how they suggest you save your files. // Squarespace, for instance, recommends uploading hero images that are between 1,500 and 2,500 pixels wide. Some platforms will also automatically save your images at various dimensions. WordPress makes three copies of any uploaded image, or more, depending on your theme. Do you homework for your specific platform.
-
Size your images only as large as your content width. // If your area for content on the page is 700 pixels wide, why make your image wider than that? Anything bigger will automatically be shrunk to fit those dimensions anyways. No need to increase that image file size; follow the width of your page template.
-
Don’t forget aspect ratio. // Your television, for example, displays in a 16:9 ratio. Translation: 16 (1920 pixels, in HD) across and 9 high (1080). If you change an images width and don’t adjust its height proportionately, you’ll blur or distort the image and affect image quality.
-
Always save in pixels, not inches. // If you resize your image in Photoshop, always choose “pixels.” That’s how a screen is designed to process your image. Inches should be saved for print materials, as they store more detailed data and have larger file sizes.
-
Smaller dimensions usually correlate with small file sizes. // Usually, reducing the aspect ratio of your image will, in turn, reduce the file size. Smaller file size means quicker load time and better page speed brownie points from Google.
YOUR MAGICAL OPTIMIZATION SPELL: Check your web platform for image recommendations. Then, figure out what your content width is and shrink your image accordingly, while maintaining a proportionate aspect ratio.
Compressing your Images for Web
Image compression involves minimizing the bytes in a graphic file, in some instances by removing the number of colors present in the image (transform encoding) or by dropping or averaging some color information while maintaining luma brightness information (chroma subsampling).
These all can get very confusing, but we’re not going to overload you (but curious souls can learn more here). Here’s some more good-to-knows around image compression.
Lossy Versus Lossless Compression
Have you ever seen an image that looks like tiny, square, pixelated blocks? That’s lossy compression at work, the degrader. Lossy compression takes away or “throws out” certain redundant pixels in order to reduce the file size. In the case of the pixelated picture, too many slight variations of colors were tossed out and no longer blend naturally. When compressed too greatly, this degrader can manipulate visual quality of your picture.
Lossless compression, by contrast, will reduce your image size without altering or deleting any of the original file’s data. If you have to adjust the image again after the compression, all your pixels and colors will remain. ZIP files, for example, use lossless compression.
So what’s better, lossy or lossless? Typically lossy compression works best for large background JPEG images, producing a very small file size that loads very quickly. But it’s important to know that lossy compression is irreversible. Once the file data is ditched, it’s gone, meaning every time the image is altered moving forward— resized or compressed in email, etc.— the quality keeps getting poorer and poorer. That’s why many turn to lossless compression, as you can still compress and reduce the file and preserve near-similar quality and appearance.
“Save for Web” Compression
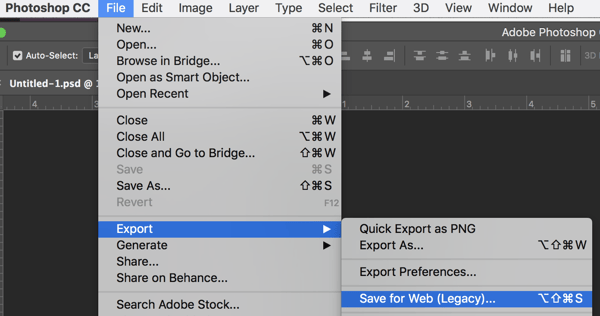
Editors like Photoshop will often offer a “Save for Web” export option, which does some of the file compression work for you, stripping unimportant metadata and shrinking your image file size. If using Photoshop, do it!
YOUR MAGICAL OPTIMIZATION SPELL: Choose lossless whenever possible and “Save for Web.”
Naming your Images
Absolutely, positively, don’t miss the opportunity to weave your keywords into your image names for improved SEO. Use hyphens or underscores to separate the words in the file name and avoid question marks, percent signs and ampersands, which don’t load correctly and can cause unexpected behavior in image galleries.
An example of a file name for one image in this article, for instance, was: "How-to-Optimize-your-Images-for-Web-Best-Practices-for-Improved-Page-Speed-SEO-Wizardry." Woah, long name— but we sure got a lot of keywords in there for search bots to see, all unbeknownst to those seeing the picture on their screen. Luckily, your image doesn't get larger when you name it a longer name, but don't keyword-stuff and abuse the system either.
Not sure what keywords to use? We have a whole article on how to find the right Google keywords for your business.
Improve your Overall SEO
You’re here reading about optimizing your images for web because you want to improve your SEO, right? As you know, image optimization isn’t the only way to increase your page speed and boost your odds of ranking on Google (and be a SEO wizard).


.png?width=600&name=Webinar%20Thumbnail%20(3).png)
